


How To Install Splunk in Red Hat Enterprise Linux 7
- Munshi Hafizul Haque

- Jul 29, 2020
- 4 min read
Updated: Oct 3, 2021
Splunk is a product that captures, indexes, and correlates real-time data in a searchable repository from which it can generate graphs, reports, alerts, dashboards, and visualizations. Basically we can collect all the logs from different data sources in our data center and visualized on a single dashboards, and many more. Let's install Splunk,
Steps:1 To download the Splunk at "Download Splunk Enterprise for Free | Splunk". And copy it to the target system.
# scp ./Downloads/splunk-8.0.5-a1a6394cc5ae-linux-2.6-x86_64.rpm root@idm2:/root/Steps:2 To install the Splunk rpm in the system.
# yum install splunk-8.0.5-a1a6394cc5ae-linux-2.6-x86_64.rpm -y
Loaded plugins: enabled_repos_upload, package_upload, product-id, search-disabled-repos, subscription-manager

Examining splunk-8.0.5-a1a6394cc5ae-linux-2.6-x86_64.rpm: splunk-8.0.5-a1a6394cc5ae.x86_64
Marking splunk-8.0.5-a1a6394cc5ae-linux-2.6-x86_64.rpm to be installed
Resolving Dependencies
--> Running transaction check
---> Package splunk.x86_64 0:8.0.5-a1a6394cc5ae will be installed
--> Finished Dependency Resolution

::::::::::::: CUT SOME OUTPUT :::::::::::::

  Installing : splunk-8.0.5-a1a6394cc5ae.x86_64                                                                       1/1
complete
Steps:3 To start the Splunk service and set the environment setting for Splunk.
# export SPLUNK_HOME=/opt/splunk/
# export PATH=$PATH:$SPLUNK_HOME/bin

# vi /etc/profile.d/splunk.sh
#!/bin/bash
export SPLUNK_HOME=/opt/splunk/
export PATH=$PATH:$SPLUNK_HOME/bin

# chmod +x /etc/profile.d/splunk.sh
# source /etc/profile.d/splunk.sh
# echo $SPLUNK_HOME
/opt/splunk/

# splunk start --accept-license
This appears to be your first time running this version of Splunk.
Splunk software must create an administrator account during startup. Otherwise, you cannot log in.
Create credentials for the administrator account.
Characters do not appear on the screen when you type in credentials.

Please enter an administrator username: admin
Password must contain at least:
   * 8 total printable ASCII character(s).
Please enter a new password: ********
Please confirm new password: ********
Copying '/opt/splunk/etc/openldap/ldap.conf.default' to '/opt/splunk/etc/openldap/ldap.conf'.
Generating RSA private key, 2048 bit long modulus
............................................................................................+++++
...+++++
e is 65537 (0x10001)
writing RSA key

Generating RSA private key, 2048 bit long modulus
..............+++++
......+++++
e is 65537 (0x10001)
writing RSA key

::::::::::::: CUT SOME OUTPUT :::::::::::::

Waiting for web server at http://127.0.0.1:8000 to be available.... Done


If you get stuck, we're here to help.
Look for answers here: http://docs.splunk.com

The Splunk web interface is at http://idm2.lab.munshibari.biz:8000
Steps:4 To set the Splunk script to run Splunk service at system boot.
# splunk enable boot-start
Init script installed at /etc/init.d/splunk.
Init script is configured to run at boot.
Steps:4 To verify the Splunk services running from my laptop browser with http://idm2.lab.munshibari.biz:8000 url, as below.

login with admin (as has set during the installation) and admin password to explore.
Basic Settings in Splunk:
Steps:1 To change timezone from the Splunk Web Based GUI
Click Administrator > Preferences and change the Time Zone, as below.

Steps:2 To change Indexing disk space to avoid warning message.
Click Settings > Server Settings (Under SYSTEM) and change the 500 MB, as its my requirements

Steps:3 To restart the Splunk service after the changes.
# service splunk stop
Stopping splunk (via systemctl):                         [  OK  ]
# service splunk start
Starting splunk (via systemctl): [ OK ]Steps:1 To add data from the Splunk Web Based GUI
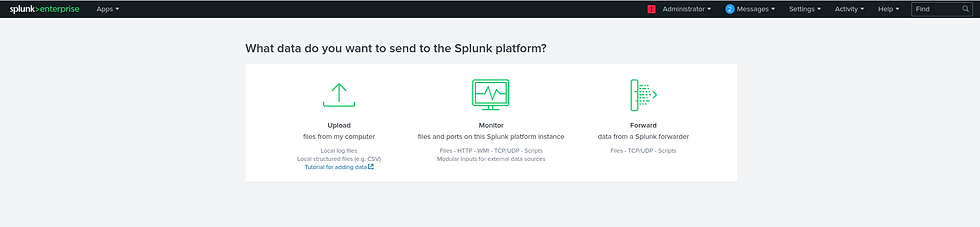
From the home pages click Add Data, as below

Or Click Settings > Add Data, as Below

Steps:2 Click Monitor from the Next Windows, as below.
Steps:3 Click HTTP Event Collector, from from the Next Windows, as below.
Type, any name in the Name field and Click Next, as below

Steps:4 Select main and history indexes, make main as the default indexes and click Next, as below.

leave the remaining setting as default and we can change the setting later on, if required.
Steps:5 To review the HTTP Event Collector setting, as below.

click Submit, if all correct. Make note on the Token Value for your further use. as below.

Steps:6 To enable the data sources, Click Settings > Data Inputs, as below

Steps:7 To click the HTTP Event Collector link, as below., as below

Steps:7 To click the Global Settings to enable the HTTP Event Collector data source. it's disable as we can see as below.

Click the Enable button and make sure Enable SSL check box is checked, as below.

Now our Splunk is ready, and the Splunk HTTP Event Collector listens on 8088 to get event logs from the client system and the URL (endpoint) will be "https://yoursplunk:8088/services/collector/event"
Steps:1 Need to send some example events from the client systems. Moving forward we need that Token to authenticate at the endpoint, as below.
1. Sending basic example events to Splunk
# curl -k "https://idm2.lab.munshibari.biz:8088/services/collector" \
>     -H "Authorization: Splunk 2b1e40d1-0cf4-4773-8909-085c2a50531f" \
>     -d '{"event": "Hello, world!", "sourcetype": "manual"}'

{"text":"Success","code":0}
2. Sending basic example events to Splunk with batching:
# curl -k "https://idm2.lab.munshibari.biz:8088/services/collector" \
>     -H "Authorization: Splunk  2b1e40d1-0cf4-4773-8909-085c2a50531f" \
>     -d '{"event": "Pony 1 has left the barn"}{"event": "Pony 2 has left the barn"}{"event": "Pony 3 has left the barn", "nested": {"key1": "value1"}}'

{"text":"Success","code":0}
3. Sending example events to Splunk with Indexer acknowledgement:
# curl -k "https://idm2.lab.munshibari.biz:8088/services/collector?channel=00872DC6-AC83-4EDE-8AFE-8413C3825C4C" \
>     -H "Authorization: Splunk 2b1e40d1-0cf4-4773-8909-085c2a50531f" \
>     -d '{"event": "Hello, world!", "sourcetype": "manual"}'

{"text":"Success","code":0}
We have three example events to Splunk successfully. Now we have to check those event from the Splunk GUI.
Steps:2 Click the Search & Reporting from the Home page, as below or

or click the Search & Reporting from the any pages, as below.

Steps:2 Click the Data Summary from the Search page, as below.

Click SourceTypes > manual, as below.

We can see all three Manual Event as "Hello, world!" on the "New Search" windows.

More details for one of the Manual Event.

this is our starting point, we will do play around with Splunk, will post more on it, in-sha-allah.


To help you find the best equatorial mount I have made a list of the top five telescope mounts for astrophotography. All these astrophotography mounts have the most convenient features and are very easy to understand.
I have tried to make your search quest easier I have added some equatorial mount for astrophotography where you can find the best telescope for astrophotography. You will also learn a lot more about astrophotography. I have also added some tips for astrophotography.